| << Back to History | Up to Contents | Ahead to Time Sheet >> |

CORAL mediates the use of lab equipment, both for safety and to ensure correct billing. Users may enable equipment for which they have been trained, and once enabled, charges accrue until the equipment is disabled. The Enable tab allows you to enable or disable any piece of equipment on which you have been trained.
How the enable/disable affects the equipment varies by lab and by equipment. For a few instruments, it has no effect other than to record beginning and end of use. For others, it opens or closes a screen lock on the computer that controls the equipment, while for yet others it operates a hardware interlock.
Use of the enable/disable panel is as follows:
When you expand the equipment tree, most of the equipment should show up with green arrows. If the equipment you are interested in instead shows a red icon, it is shut down and you may not be able to enable it. If this happens, please consult the lab staff. If the equipment shows a yellow icon, you can still enable it, but a previous user has reported a problem with the instrument that you may wish to read about before you attempt to use the equipment yourself. For more information, please see the Maintenance tab.
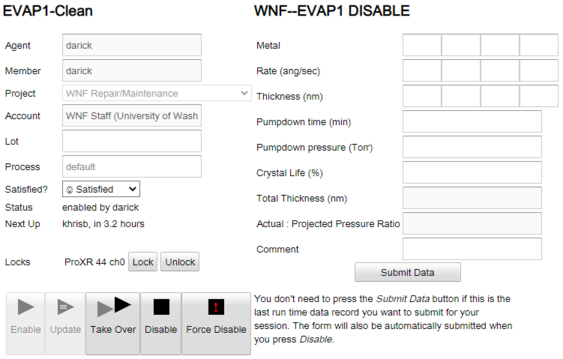
At this point, the buttons at the bottom of the form will be enabled and disabled according to instrument's status. If the instrument is already enabled (as shown in the illustration) press the disable button to disable the equipment. If you instead want to enable the equipment:
If the instrument is enabled by you and you realize that you entered the wrong billing information for this session, press the Update button to change the billing. Changes affect the entire session. If you want to change the billing only for the future portion of your session, please instead use the Take Over button, below.
If the instrument is enabled by someone else and you want to “take over” the instrument from that user without disabling it first, perhaps because the operation of the interlock would interfere with the correct operation of the instrument, press the Take Over button instead. This procedure does not work in all labs; as of this writing it is possible for normal users of the WNF lab, but is only possible for staff in the MAF lab. Please respect other users, and do not take over a session without consulting the user you are taking over from, or lab staff if the user is not available.
Staff users have an additional button when instruments are shut down: Force Disable. Pressing Force Disable disables the instrument without attempting to operate the lock, if any. This allows staff to end user sessions (including their own) when the instrument is not responding.
Some instruments are configured with an at-disable qual protocol (see Definitions>Qual Protocol). If the instrument has one of these, the enable/disable panel includes a data form to the right of the enable form which includes all the data fields described by the protocol. If any of these fields are required, as indicated by an asterisk, the instrument cannot be disabled until data have been submitted at least once.
| << Back to History | Up to Contents | Ahead to Time Sheet >> |