| << Back to Invoices | Up to Contents | Ahead to Users >> |
First, a word about the structure of the process. The new user
process is modeled on constraints satisfaction, rather
than a fixed linear process or a finite state machine. Every
prospective user's state
consists of the values of all of
their check boxes taken together, and from that, two values are
produced: the binding (or active) request
constraint and the binding approval constraint.
Request constraints simply mean that a prospective user must have
filled in all the information before they can reach the goal of
being a fully qualified lab user (or PI or whatever). Approval
constraints require that approvals be given before a user can
reach the goal. Which constraint is active depends on
the order of the steps in that user's path, which in turn depends
on the lab and the user's chosen user role.
A quick summary of a user's state
can be given as
their active request constraint, if any; if none, their
active approval constraint; and if none, they have reached
the goal.
The forms are designed so that most users should be able to enter all their information in one sitting, without needing any administrative approval.
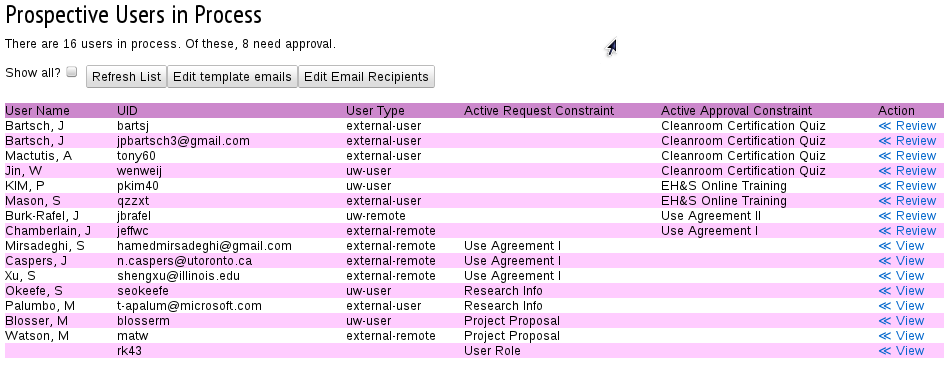
When users with a lab administrative role log into the user registration site, they are presented with a list of users in process, as well as a couple of buttons. By default, the list shows all users who have not reached their goal and who have been active in the system in the last eight weeks. If the Show completed checkbox is checked, even users who have reached their goal will be shown.
The list is sorted according first by active request constraint (according to a generic ordering of all possible constraints), then by active approval constraint, so that users who are closer to the goal are higher on the list. If Show completed is checked, users who have achieved the goal will be shown at the top.
Note that at the right-hand side of each user line there is a link, either View or Review. In both cases, the link allows you to look at the user's submissions to that point, and optionally change what they entered and/or approve their submission. The only difference between View and Review is that users shown with an active request constraint are shown with a link called View, as a hint that they have more to do before they need approval (or, that they are completely finished, and do not need any more approval).
The buttons at the top of the user list allow the editing of the default emails that are sent from the buttons on the individual wizard pages, as described below; and to change who receives the email when users' active approval constraints change. The Refresh List button, of course, refreshes the user list.
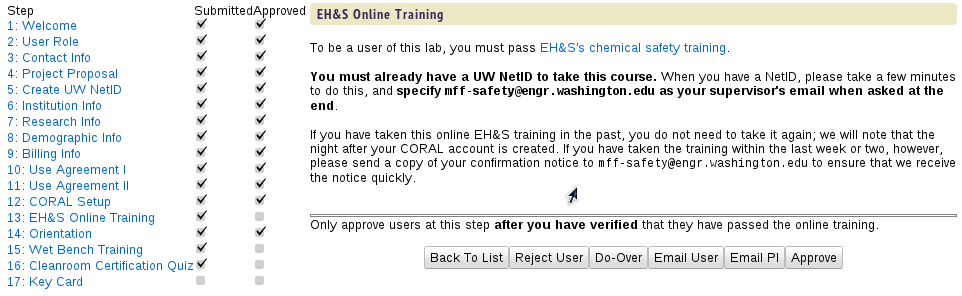
Once you have selected one of the users, you will be presented with the same check list that the user sees, displaying the active approval constraint. If you want to see what other information the user has submitted, each of the steps in the checklist is a link, and you can click on those links to see what, if anything, the user has submitted at those steps. (Note, however, that if you make changes to a user's submissions and then click on one of these links, your changes will be forgotten.)
Generally speaking, the top of the main page body will show the same thing to you as it does to the user at that stage, but below that, there are sometimes notes which are only for administrators. In the example shown, there is a note that you shouldn't approve the user for online training before verifying that they have actually passed the training.
The buttons are as follows:
This simply takes you back to the user list. No changes you have made to the form will be saved.
Remove all user approvals and take the user off of the list. This indicates that the lab doesn't have the required capabilities, or that the user is a duplicate or otherwise not interesting.
You will be given a popup to send email to the user explaining the reason for rejection; if you don't want to send email, press Cancel; but note that the rejection has already taken place.
This saves any changes you might have made to this form, and un-checks the submitted box (and also the approved box) from the check list. As above, you will be given opportunity to send a notice to the user. If you press Cancel, they will not receive a notice. If you need to have them do more than one step over again, you might press the Do-Over button on several different steps, and only send them email at the last of these.
Send the user email without changing anything. This can be a convenient way of asking them if they still intend to become lab users.
If the user's PI is listed, you can also send email to the PI. This, too, does not make any changes to the user's information.
This saves any changes you might have made to this form, and checks the Approved box for this step. If the button is called Force Approve, it means that we might reasonably expect this step to be approved automatically, but you can override that process if you need to. In general, if you are approving a step that involves information not shown on the form, you should already have verified that the necessary qualification has been achieved before marking your approval.
| << Back to Invoices | Up to Contents | Ahead to Users >> |